QUICK START GUIDE
Brief Introduction
- CIDS is a platform for various instructional planning including e-learning for students. While the ASIE Integral Instructional Design Model has a dual function – (i) as an Instructional Planning Tool (ii) as a 21st Century Instructional Design Model.
- The main aim of the development of the Collaborative Instructional Design System (CIDS) is to provide a platform for teachers to perform their instructional planning and implement appropriate learning strategies in a virtual environment.
Types Of ID
CIDS offers free IDs to 4 types of users
-
- asieguest (for trial only) with limited features. You may not be able to design your lesson for individual needs. All features (class category, class level, subject, teaching period & time table) have been preset regardless of the country origin. Please do not change the setting to avoid errors).
-
 cidsuser (standard package – stand-alone) individual user, with student enrolment for e-forum (part of virtual learning).
-
 cidsuser (institutional package) IDs given to the entire institution with student enrolment for e-forum (part of virtual learning)
-
- cidsuser (premium package) more advance features with student enrolment for full virtual learning features
- cidsuser (premium package) more advance features with student enrolment for full virtual learning features
It is summarized in the following chart

Classification of Users
Modules
CIDS FEATURES
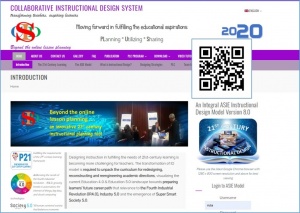
CIDS Homepage – (https://asiemodel.net)
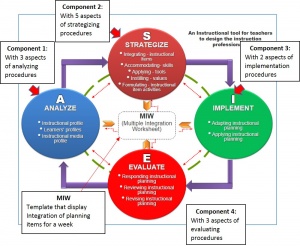
Component Of CIDS
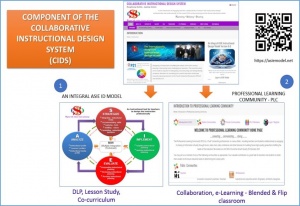
Components of The Integral ASIE ID Model

Specifications of ASIE Model
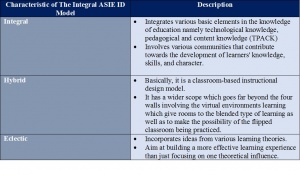
Characteristic of The Integral ASIE ID Model
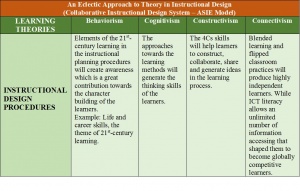
An Eclectic Approach to Theory in Instructional Design
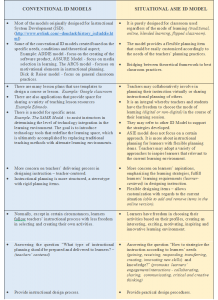
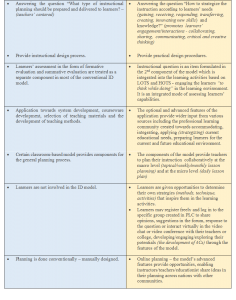
Comparison of ID Models
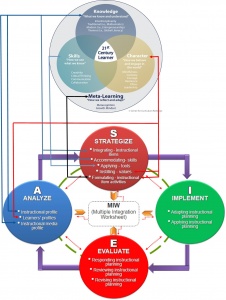
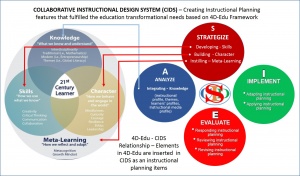
The Integral ASIE ID Model – Fulfill the 21st Century Learning Framework (Four Dimensional Education – Center for Curriculum Redesign, 2015)
(Current CIDS version 8.0)
(New Features – Version 9.0 – will be released in early 2021)
Terminologies
- Collaborative Instructional Design System (CIDS) – integration of various aspects of teacher and administrator education planning to meet local and global educational needs
- The Integral ASIE Instructional Design Model – A mechanism (based on instructional design principles & theories) that provides systematic & professional instructional planning.
- Professional Learning Community (PLC) – features for teachers to perform Lesson Study as well as interaction and participation of various communities in contributing & sharing ideas, information & feedback to assist teachers in the teaching & process through forums, chat, video conferencing, and engagement in virtual learning with students.
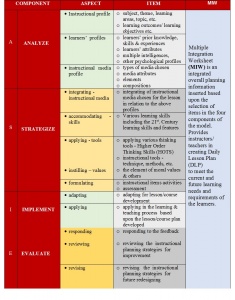
- Components – refer to the 4 components in the Model.
- Aspects – refer to various planning aspects in the components.
- Items – multiple customizable items in each aspect of the components.
- YIP – Yearly Instructional Planning (annual lesson plan) consisting of several weekly instructional plans.
- MIW – Multiple Integration Worksheet – display weekly instructional planning information in the creating of the DLPs.
- DLP – Daily Lesson Plan – a selection of items from MIW.
- Instructional Events – procedures/steps in teaching & learning activities
- Record – refers to every single teaching record (DLP) created.
- Shared Records – records sent for sharing
- Upload Shared Material – refers to the process of uploading learning materials – video clips, images, and info from the local folder or sources from the internet (such as YouTube, or cloud storage) for sharing.
MODULE 1: BASIC APPLICATION
BASIC APPLICATION PROCEDURES
CIDS Main Page
User will login to the CIDS Main Home Page by the given ID (User name & Password)
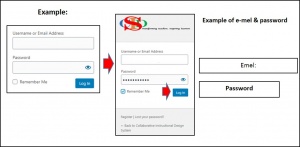
- (i) When the user browses https://asiemodel.net the main page of CIDS is displayed as below: (you may the bar code for mobile login)

(ii) Fill in the required information
- Write ID – Username & Password
- Example – for asieguest – Username: asieguest Password: asieguest
- Example – for cidsuser – Username: cidsuserxxx Password: 123456
- Press the Login button
- The user interface will be displayed for asieguest users (for asieguest – it doesn’t require to register)
- The registration page will appear for other users (registration is required for a new user)
Registration page (Example of user registration)
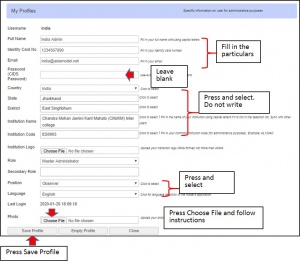
Procedures
- Fill in the space or some parts need to press and select the pre-set contents
- Follow instructions at the side of the empty space for guidance
- Institution Logo – for institution admin to upload logo (png file – size not exceeding 200kb) – it will automatically appears for all users in the same institution (for institution & premium packages)
- Certain items may appear to specific ID type only:
- Secondary Role – ability to monitor/verify lesson plans
- Coordinator – for institution admin
- Guide – ability to insert comments on the teachers’ lesson plans activities.
- Digital Signature – ability to insert digital signature
- Secondary Role – ability to monitor/verify lesson plans
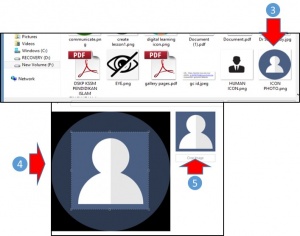
- Personal Photo – every user should have an official photo (jpeg file) – passport size to be uploaded in the system
- Press Save Profile and wait for the response
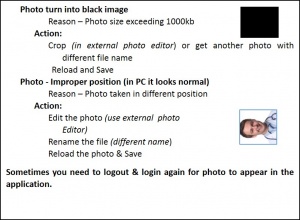
- An error message will be appear if the size of photos are exceeding (large size) than the recommended size. Please edit and reload the photo using different file name
- Sometimes you need to logout and login again for photo (institutional logo and personal photo) to appear in the application.
- You may edit the profile later
- To edit the profile, press Profile at the main menu of the model and select Edit My Profile.
Error & Solution
CIDS User Interface
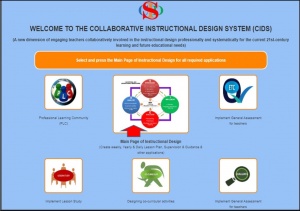
- Press “Main Page of Instructional Design”
- The main page of the application will appear.
Overview CIDS Features
CIDS is a system and not a template, thus it has certain functions in the Main Menu. Please refer to the functions of the related topic. CIDS consists of The Integral ASIE Instructional Design Model – a mechanism for ID-based lesson planning.
The main Page of The Integral ASIE ID Model.
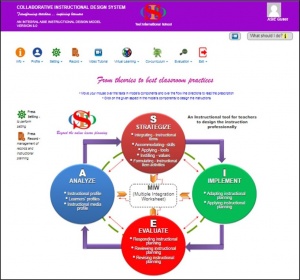
- In the full version, the functions of each menu are described in the application associated with it.
- The menu for asieguest (trial version) has limited functions .
Functions of the Main Menu Bar
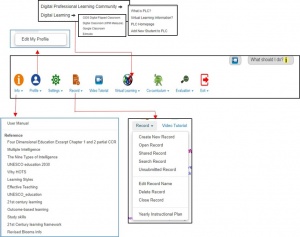
- Types of ID will determine the menu
- For full version you may explore the menus (every function of the submenus).
Setting:
Instructional Settings
Applicable for cidsuser (standard, institution & premium packages only)
Asieguest user may skip this procedure (asieguest user – all features (class category, class level, subject, teaching period & time table) have been preset regardless of the country origin. Please do not change the setting to avoid errors).
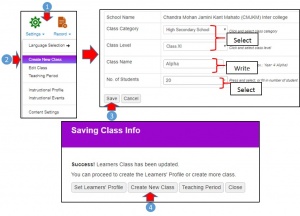
Create Classes (for other users)
You need to create classes before proceed to planning procedures.
(for Institution & Premium packages, the admin will create all classes available in the institution and it will be appeared automatically in every teachers’ IDs. There is no submenu of Create New Class for teacher’s’ ID type)
Press Settings at the main menu
- Select Create New Class, Read instructions, Fill in & Select information (refer example below)
- Press Save
- You may create other classes involved by pressing Create New Class and repeat the procedures
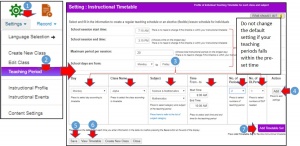
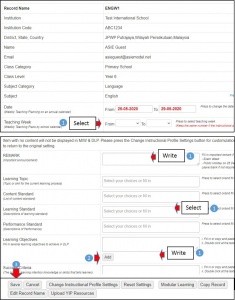
Settings Of Teaching Period (Timetable)
Individual teachers may create their own time table after the classes has been created by the admin (for institutional & premium packages).
Press Settings
- Select Teaching Period
Do not change the default setting of the following items (School session start time to Maximum period per session) if your teaching periods falls within the pre-set time.
- Press and select information of your teaching particulars of each subject and class
- Press Add
Repeat for the next subject and class involved. Do not include Recess time (only instructional time)
- Press Save
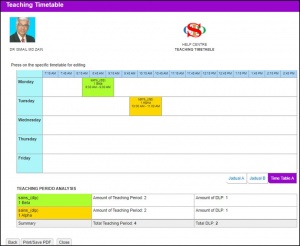
- Press View Timetable – to view/print the time table
- Press Add Timetable Set – if require more than 1 set
The Time Table
Planning Procedures:
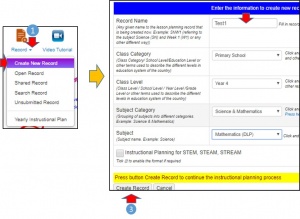
Create Record
For all users (with different ID type) involve in teaching & learning
- Press Record in the Main Menu.
- Press Create New Record.
- Fill in the required information in the spaces provided. For asieguest users, select Class Category (Primary or Secondary only), Class Level (Year 6 or Form 5 only) Subject Category (Language), and the Subject name (English). For other users you may select accordingly.
Do nothing in the Learning Plan options for STEM, STEAM, STREAM, unless it is required (not applicable for asieguest).
- Press Create Record.
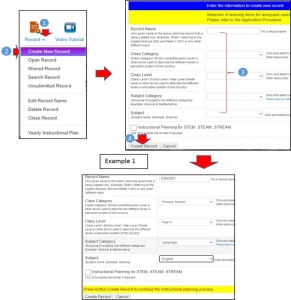
The following page will be exhibited:
Please read instructions at each item
- Press and select or copy and paste or fill in the information
- Press Add or press enter for each content selected.
(You can add content to the space of these items - Press Save
Please take note that for asieguest, the content of the instructional items has been preset. In the full version (Premium Package) the instructional profiles are customizable according to your school syllabus. User may change all the instructional items into a simple structure, key in the preset content or without preset content: Example of a simple structure (with fewer items) are shown below:-
Main Topic:
Subtopic:
Learning Objectives:
By pressing the Save button the flow of the planning continues to the next screen
- Read instructions
- Press Next Aspect, or press Learners’ Profiles to move to the next aspect (Learners’ Profiles)
- Fill in the information required
- Press Save
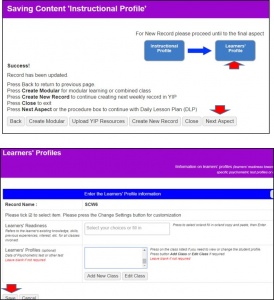
- By pressing the Save button the flow of the planning continues to the next screen
- Read instructions
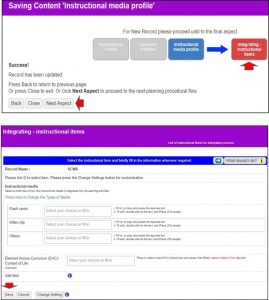
- Press Next Aspect, or press Instructional Media Profile to move to the next aspect (Instructional Media Profile)
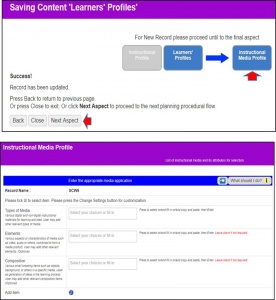
- Fill in the information required
- By pressing the Save button the flow of the planning continues to the next screen
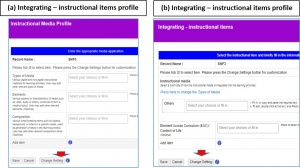
- Read instructions
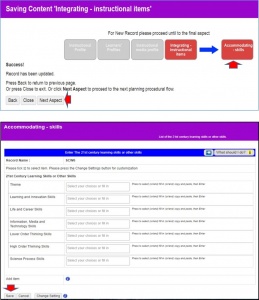
- Press Next Aspect, or press Integrating – instructional items to move to the next aspect ( Component 2: Integrating instructional items)
- Fill in the information required
- By pressing the Save button the flow of the planning continues to the next screen
- Fill in the information required
- By pressing the Save button the flow of the planning continues to the next screen
- Read instructions
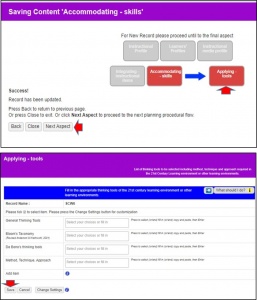
- Press Next Aspect, or press Accommodating skills to move to the next aspect (Accommodating skills)
- Fill in the information required
- Press Save
- By pressing the Save button the flow of the planning continues to the next screen
- Read instructions
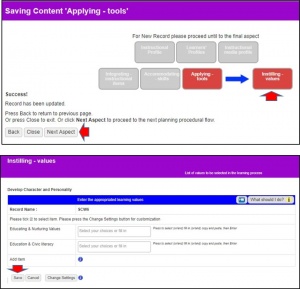
- Press Next Aspect, or press Applying tools to moves to the next aspect (Applying tools)
- Fill in the information required
- Press Save
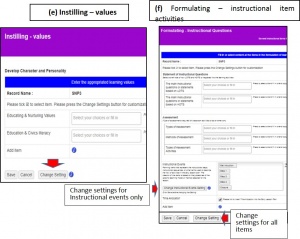
- Read instructions
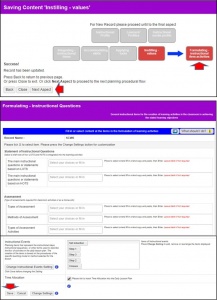
- Press Next Aspect, or press Instilling values to moves to the next aspect (Instilling values)
- Fill in the information required
- Press Save
- By pressing the Save button the flow of the planning continues to the next screen
- Read instructions
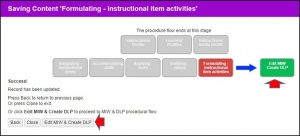
- Press Next Aspect, or press Formulating: Instructional item activities to moves to the next aspect (Formulating: Instructional item activities)
- Fill in the information required
- Press Save
- By pressing the Save button the flow of the planning continues to the next screen (Edit MIW & Create DLP) – the final step in the lesson planning
- Read instructions
- Press Edit MIW & Create DLP (Component 3 – Edit MIW Create DLP)
- All information from planning items will be accumulated and inserted in MIW (Multiple Integration Worksheet) a weekly planning template for the creation of Daily Lesson Plan (DLP)
Multiple Integration Worksheet
(Weekly planning)
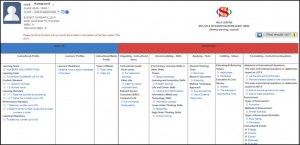
At this stage, the user has completed the weekly instructional planning. From MIW (master copy or weekly planning), the user will select the content of each item to create Daily Lesson Plan (DLP).
Procedures in creating Daily Lesson Plan (DLP): Select/fill in the information
- Press the icon of the time table
- Select/press the class concerned (make sure the class has been created)
- Class information will automatically inserted (you may change the date/time if required)
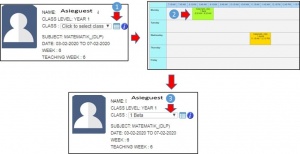
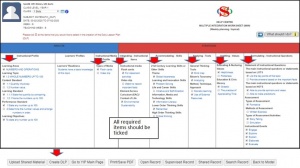
- Select & Tick √ the required items in every aspect of the in MIW for a particular DLP.
(Please take note the content of MIW is for 1 week teaching period. Select and tick item for a particular DLP only) - Press Create DLP at the end of the page (the menu will float upwards)
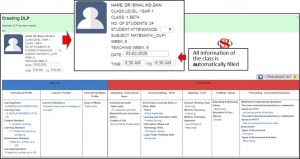
Your Daily Lesson Plan (DLP) on a particular day (selected from the time table) will be displayed as shown below.
- You need to scroll down to fill the classroom activities as an important part of the Daily Lesson Plan
- It is the 3rd component of the model – Implement
- Read the instruction
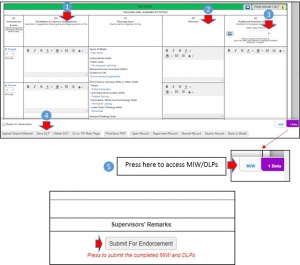
Creating Teaching & Learning activities
- Write your classroom activities (in column b – Facilitation & Learners’ Engagement) based on the planning item (displayed in column c)
- You may add remarks (column d)
- Or google over the internet (column e) to find resources following the category listed.
User may use their creativity by exploring other features of the model to enhance the instructional planning as preparation in achieving the effectiveness of the classroom practices - Press Save DLP at the menu
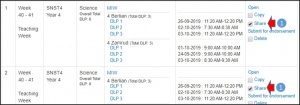
- DLPs will be listed in the folder according to the classes created which are located at the right-hand corner of the lesson plan
- Press Submit For Endorsement for verification purposes by the adminisrators.
(to enable the lesson plans visible to the administrators)
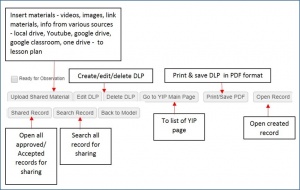
Overview Of The Menu Button At MIW (Multiple Integration Worksheet) & DLP (Daily Lesson Plan) page
You may explore and use the buttons whenever required. The functions of the buttons are explained in the specific modules.
Your basic hands-on session ends here. For asieguest user, you may proceed to get a free Standard Package ID for your personal (stand-alone) in designing your personal instructional planning. Standard Package user may upgrade to Institution Package or Premium Packages for wider used of the application. Do not hesitate to contact us for inquiries. Our consultant is a former senior lecturer in instructional design with more than 35 years of experience will attend your request [email protected]
MODULE 2: INTERMEDIATE (ENHANCING THE INSTRUCTIONAL PLANNING)
Inserting instructional materials (Images, video clips)
The model allows user to insert different kinds of material to the instructional planning with restrictions on the size of the materials (not more than 200 Mb – to ensure the smoothness of the uploading process). There are various ways of inserting materials into the instructional planning.
The insertion of the material can be accessed at various upload buttons as listed follows:
- Menu at MIW & DLP page
- Menu at Reflection page

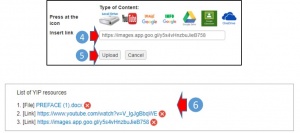
When the user press the those buttons it will display the following links:
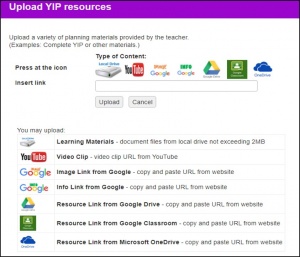
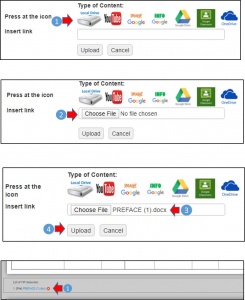
Upload from local drive:
- Press icon at the local drive
- Press Choose File, select file from local drive
- Paste at the space provided
- Press Upload
- Follow instruction, finally the link will be listing at the end of lesson planning/MIW page
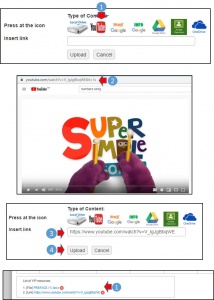
Upload from You Tube:
- Press the icon of YouTube, search/select the video clip
- Copy url of the video clip (it may differs – depending on browser’s version/mobile)
- Paste at the space provided
- Press Upload, follow instruction
- The link will be listing at the end of lesson planning/MIW page
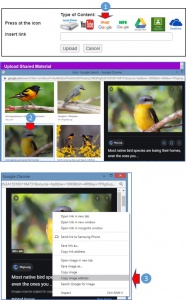
Upload from Google Image:
- Press icon of Google Image
- Search/select the image
- Click right select Copy url of the image (in various ways)
- Paste at the space provided
- Press Upload
- Follow instruction, link will be listed at the end of lesson planning/MIW page
MODULE 3: ADVANCE (SHARE, COPY RECORD & CHANGE SETTINGS)
Select record for sharing (MIW & DLP)
Send record for other users to share
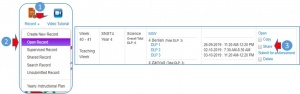
- Press Record
- Press Open Record
- Identify the Record you want others to share (single record) and press Share (do not tick)
Sharing a record
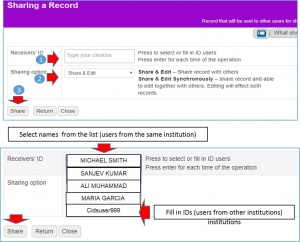
- Click on the Recipients’ ID List (name of teachers in the same school) and select the name of the teacher you want to share
Enter the ID (not the name) manually if the teacher is in another school in the same district or state or another district or state.
- Sharing option – Share & Edit
- Press Share
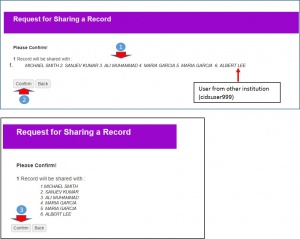
Sharing confirmation
- Selected names will be listed for confirmation.
- Press Confirm
A confirmation message will be displayed, Press Confirm again
Sharing option
You have an option to send multiple records to be shared
Option 1: Sharing multiple records
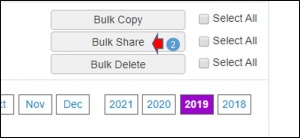
- Identify and select √ (tick) Share records (multiple records) to be shared
- Press Bulk Share at the end of the page (the selected records will be shared)

Option 2: Sharing all records
- Select All √ (tick) at the end of the page
- Press Bulk Share (all records will be automatically ticked)
Receive shared records
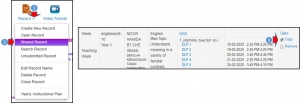
- Press Record at the main menu,
- Select Shared Record
A list of records that have been shared will be displayed
These records need to be copied so that it will be displayed as your own record in the submenu Open Record - Press Copy
You may copy or remove multiple records
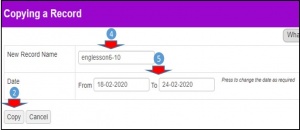
4. You may rename the record
5. And reschedule the record
6. Press Copy
The record will be listed in the Open record menu in a specific month and year
You may proceed to open and edit the the shared record accordingly
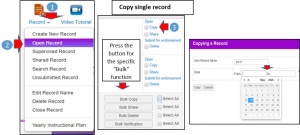
Copy Record (single, multiple or all records)
- Press Record
- Press Open Record
- Press the word Copy, at the required record (do not tick -√)
User may select a range of dates to locate the record
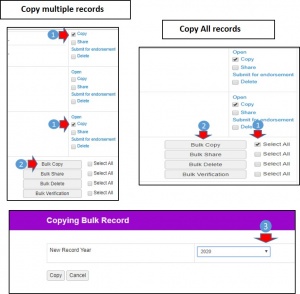
Copy Multiple records
- Select and tick √ at each record required
- Press Bulk Copy
Copy All record on the page
- Tick √ Select All (all records on the page will be automatically ticked)
- Press Bulk Copy
- Bulk Copy (multiple records or all records) – User may select a specific year for the copied records to be located
Change Settings
CIDS provides this feature at several aspects of the design procedures to allow teachers to determine and customize the items in fulfilling their own needs as well as encouraging the creativity of the teacher in designing the lesson. This will create more flexible planning for teachers in reference to the concept of unpacked the curriculum. However, the teacher can restore the original setting by pressing the Reset Settings button.
Instructional Profile Settings
- When Records are created – the user selects the content in the Learning Profile items.
- The content is copied from the syllabus provided by the local curriculum development center.
- The arrangement of these items may sometimes vary from one subject to another.
- CIDS organizes items so that their content depends on one item and another for easier content selection.
- Users may change/create instructional items and fill in the content manually.
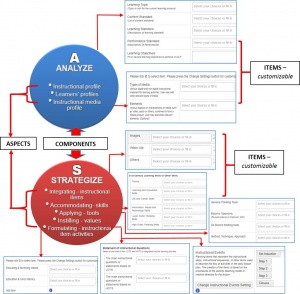
Model’s Composition: Components, Aspects & Items
Components – cannot change/customize
Aspects – cannot change/customize
Items – customizable/ able to add new items/disable the default items (for the 1st & 2nd Component) . Please refer to the diagram below:-
Changing Item settings on the Learning Profile and other profiles
- Start by creating a new record – Record – Create New Record
- Fill in/Select content from the items
- Press Create Record
a. The following features will be displayed
b. Don’t fill in anything
1. Press Change Instructional Profile Settings
c. The following features will be displayed
1. There are items that have been checked by default.
You may uncheck it (the item and content will not be displayed in the instructional profile)
You may select other relevant items
- Or create new item
- And press Add
- Press Save to save the setting
Read instruction
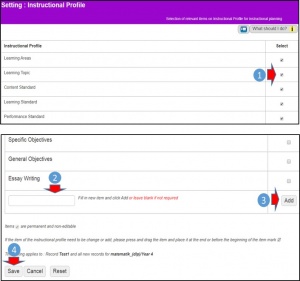
d. At the Instructional profile, you may press Reset Settings to get back the default setting
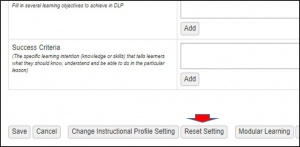
e. Don’t change the Item settings on the Student Profile
2. Other Aspects that allow the user to change setting are listed below. You need to press Change Settings and follow instructions.

MODULE 4: VIRTUAL LEARNING
Introduction
A. What is Virtual Learning?
- Virtual learning (VL) is a learning experience that is enhanced through utilizing computers and/or the internet both outside and inside the facilities of the educational organization.
- It is also known as e-learning, digital learning, hybrid learning, home learning or other related terms.
- The instruction most commonly takes place in an online environment.
- The teaching activities are carried out online whereby the teacher and learners are physically separated (in terms of place, time, or both).
- Distance learning conducted in a virtual learning environment with electronic study content designed for self-paced (asynchronous)or live web-conferencing (synchronous) online teaching and tutoring.
(Ref: https://www.vedamo.com/knowledge/what-is-virtual-learning/)
B. What devices and tools to be used?
-
- Use any device from a smartphone (simple application such as WhatsApp, video calls, etc.) to laptops and tabs.
- Use innovative tools and strategies (using education applications such as Google Classroom, Google Meet, Zoom, Apple learning Centre, Edmodo, etc.)that can be applied in a smartphone, laptop, and other devices
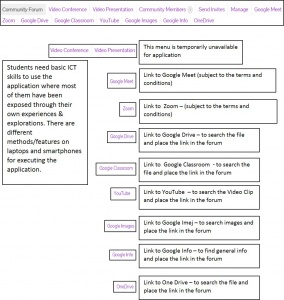
C. CIDS Virtual Learning (CVL)
- CVL integrates/links all the above tools and applications.
- CVL provides 3 alternatives strategies from simple to more challenging features depending on users’ capabilities and their knowledge in ICT.
- Strategy 1: Professional Learning Community e-Forum (a simple interactive virtual learning)
- Strategy 2:Interactive Video Conferencing (Webinar – using a wide selection of communication tool)3.
- Strategy 3:Virtual Flipped Learning (comprehensive virtual learning platform based on Moodle application)
- CVL allows students-lecturer/teacher interaction in the invitational virtual learning session.
- CVL capable of integrating links of the virtual learning activities to the lesson plan (administrator will be able to access resources of the CVL activities).
- Basic knowledge of ICT is required in implementing visual learning in school.
Digital Professional Learning Community (DPLC) – E-Forum
(Participation in an interactive forum of Digital Professional Learning Community (DPLC) via laptop or smartphone)
Features
- It is simple & practical features
- User may use laptop or smartphone as a medium
- It is an interactive virtual forum platform
- Similar to the Facebook concept – already known to everybody even children
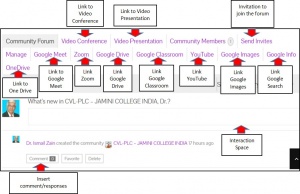
- Able to insert text (for instructions), video clips from YouTube, audio or images as a stimulus.
- Links to Google Classroom to access resources created and stored in the Google drive or in the one drive (notes, assignments, etc.)and google search for accessing other external resources.
- It will enhance the lesson conducted and inspired learners
Features of PLC (e-Forum)
Preparation – Steps
- Login to PLC – Profile updating
- Preparation of Professional Learning Community e-Forum
a. Learning environment: Digital Forum
b. Teacher/lecturer create private Group
c. Register your students - Preparation of teaching materials (Instructional media)
a. From application – document, slide, etc.
b. Should be kept in Google Drive, or One Drive
c. You may also link to YouTube and Google Search
d. You may also prepare in Google Classroom Application (for the advance user, or you may explore the application) - Preparation the PLC e-Forum
a. Fill in the instruction
b. Insert relevant teaching resource (video clips, document, etc.) - Professional Learning Community e-Forum Synchronous – teacher-student interaction at the same time
a. They may watch video clips & access/read/save material by the teacher, answer questions/quizzes, etc.
b. Giving time frames – students interact by themselves, teacher/lecturer summarizes/comment at the end of the session
c. Any other method depending on teachers’ creativity
d. Contributions from members of the PLC created(interaction in video conference, resources etc)
Procedures:
(You may use a laptop or smartphone)
Login to CIDS
Login as usual to CIDS Main Page using the same CIDS ID
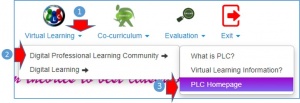
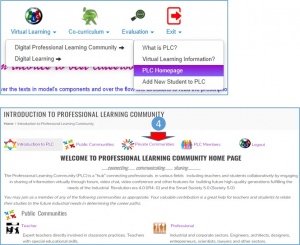
- At the main menu press Virtual Learning
- At the Submenu press Digital Professional Learning Community
- Then press PLC Homepage
- You may press the other 2 submenus for reading
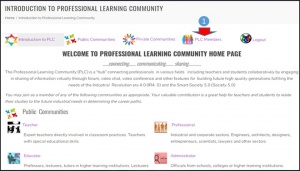
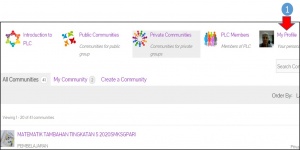
The PLC Homepage will appear as below:
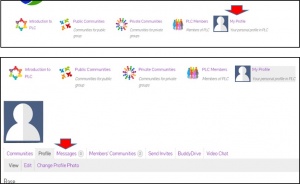
Updating PLC Members Profile (only for the 1st login)
Read information on PLC
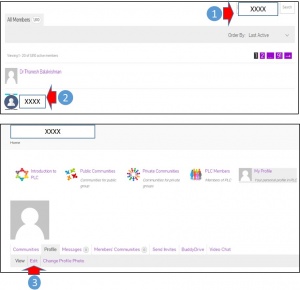
1. Press PLC Members
- Search & Selectyour name
- (Example here: My name Dr. Ismail Zain – You choose your own name)
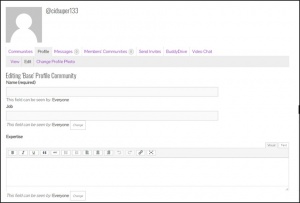
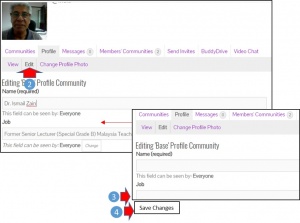
- Press Edit – to edit full profile
It will display the profile
Fill in the required information & press Save Changes at the bottom of the page.
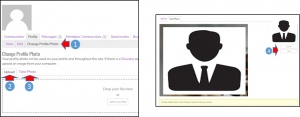
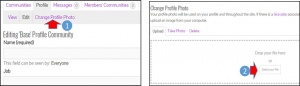
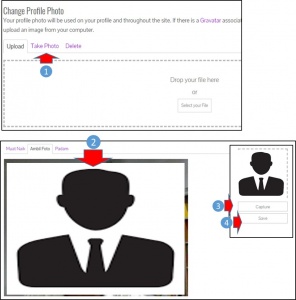
- Press Change Profile Photo – to insert your photo
- You may Select Fileto Upload Photo from your local drive
- Or press Take Phototo take a snapshot from your device.
- Press Captureand Save (for snapshot)
Follow instructions
- Your profile has been completed.
- You may edit your profile if required.
Create A Community
- It is recommended that the community group is created under the teacher’s name, not by subject or class.
- It will avoid too many communities being created.
- However, teachers are free to determine their own ways of creating their own community
- Students will log into the e-Forum once the learning activities have been prepared by the teachers
- Notifications can be made through schedules delivered at the beginning of the interaction, or through the teachers’ messages
- It can also be notified via a group of what apps or by other methods
Procedures
- Login as usual to the PLC Page and pressVirtual Learning
- Press Digital Professional Learning Community
- Press PLC Homepage
- Press Private Communities
Create community
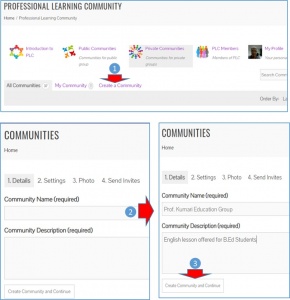
- Press Create a Community
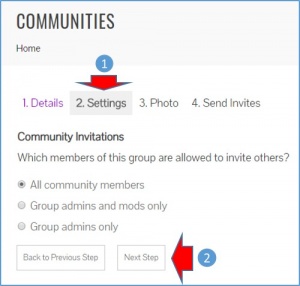
- Fill in the Detailsof the Community to be created
- Press Create Community and Continueto Photos (please follow the instructions)
- Press Settings(keep the default setting)
- Press Next Step
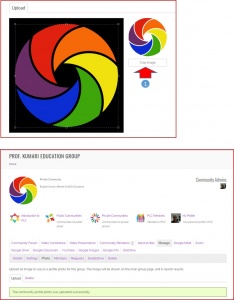
- Press Select your File
- Search & select the logo file from your folder (create a logo for your group)

Resize (crop) the photo
- PressCrop Image to save the image
Your logo will appear on the screen. You can delete or replace the photo
Create A Lesson
You can insert various materials in this e-forum (materials from Google Classroom – Google Doc, slides, etc.), video clips from YouTube, images, audio recordings from sound recorders, video recording from a smartphone or other devices, materials from Goggle Drive storage, One Drive, etc. depending on your skills and creativity. Learning will be interesting if the lecturer/teacher is creative enough to provide his own materials to his students instead of just copying links from materials created by other teachers.
You can use laptops or smartphones for this e-Forum Digital Learning.
Please take note that there are slight differences in application characteristics (application features) between laptops and smartphones (please explore).
Important!
You must prepare your CIDS lesson plans, materials (documents/video, identify links, etc.) before preparing your lesson in E-Forum. E-Forum is a tool/platform that integrates all materials for learning.
Procedures:
- Login to thePrivate Community
- Press on the community you created (example: Prof. Kumari Education Group)
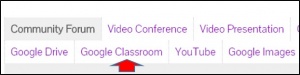
Features of e-Forum
- There are submenus for various functions
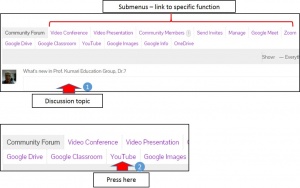
Create an activity in the lesson (insert instruction & links):
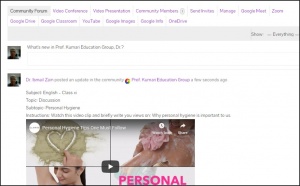
- Write in short – instructions/questions (what students need to do)
a. Enter a Subject, Topic, Discussion topic, etc. - Insert link materials (One link per delivery)
a. Examples: link from Google Drive, One Drive, Google Classroom, YouTube, Websites, etc.
b. The file must be shareable
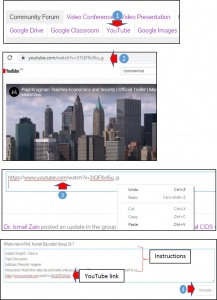
Example 1: video link
- Press on the YouTubemenu button
- Find a Video Clip and copy the URL
- Return to the E-Forum and Paste URL
- Press Send/Post
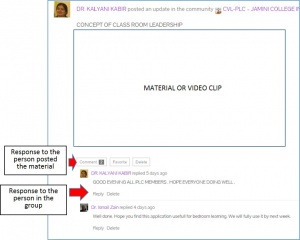
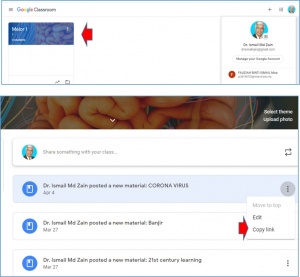
After press Post/Post Update – it will display as follows:
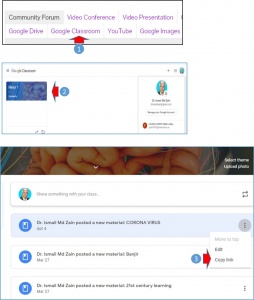
Example 2: Link to Folder (storage)
- Type of storage
- Google Classroom (Google Drive)
- Microsoft One Drive (need to sign in account –for the first time)
- Materials created by teachers need to be uploaded to Google Drive or OneDrive
- Local Drive
- Method
- Click on the relevant button (Example: Google Classroom page)
- Search for materials (kept in Google Drive)
- Copy file address (make sure it has shared permissions for all)
- Paste in e-forum
- Press Post
Example: From Google Classroom
- Press on the relevant button (Example: Go to the Google Classroom page)
- Search for materials (stored in Google Drive)
- Copy file (make sure it has shared permissions for all)
Paste in e-forum space
Press Post
- You may find materials to other links – Google image, Google Info, Google Meet, etc.
- You may record audio– save it to Google drive or One Drive and then insert the link in the e-forum.
- You may do video recording– upload it to YouTube and then copy the link to the e-forum.
- There is much more that can be done with your creativity to create strategies.
- The PLC-CIDS Digital Learning features are constantly updated to improve the learning process.
- There are also limitations (restrictions)on this application.
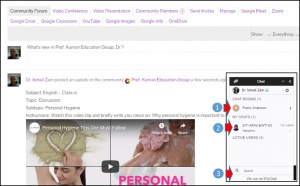
Chat Room
While you are in the e-Forum, the Chat room will appear at the bottom right-hand corner. Chat can be used as students’ informal discussion before writing in the e-forum.
- Press Public Chatroomto interact with everyone
- Or Press the specific name in the Public Chatroomto interact privately.
- You may send messages, attach files, and images too.
Interaction Structure
Student Registration
- All students in school, will be given their respective IDs login to the e-Forum.
- Lecturers/School teachers can register their students and the data can be used by other lecturers/teachers to invite them to their respective e-Forum communities.
- Lecturers/teachers should work together to determine the person who will register the student to DPLC (an error message will appear if the student is registered twice).
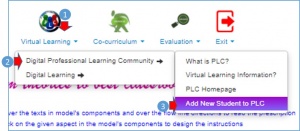
Login to the CIDS
- Press Virtual Learning–
- Press Digital Professional Learning Community (DPLC)
- Click Add New Student to PLC
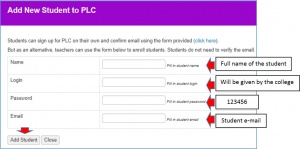
Registration to DPLC
- Fill in all required information
- Click Add Student
- Repeat for the second student
- Press Add Studentfor each student data entry
- Press Close
Student Login to e-Forum Digital Learning
Login To Digital Professional Learning Community Homepage (PLC)
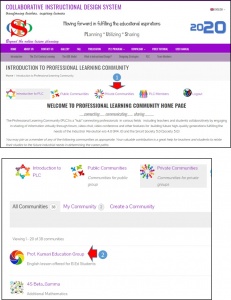
Step 1: Getting to PLC Home page
a. Browse https://bit.ly/3bchmTC
b. Full Url https://asiemodel.net/introduction-to-professional-learning-community/
c. Or use QR Code (for smartphone applications)
d. A Welcome page of Professional Learning Community (PLC) is displayed as shown below:
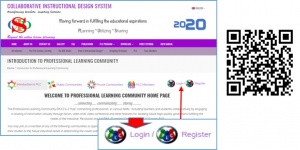
Step 2: Login to PLC – ( E-Forum)
- Press Login on the main PLC page
- Enter Email & Password – given by your lecturer/teacher
- Please remember them as you have to log in to enter to E-Forum for every occasion
- Do not change Email and Password.
- Press Login
Update Profile
i. Edit Profile
1. Press My Profile
2. Press Edit – to enter personal information
3. Fill in the Full Name(required). Others are optional. Under condition 2 Name will appear as it has been filled in during registration
4. Press Save Changes at the end of the page (left-hand-side)
b. Change Profile (Photo)
1. Press Change Profile (Photo)
ii. There are 2 options for inserting the photo
2. Insert a photo from local drive Press Select your file
3. Choose/press the file from the folder
4. Crop the image – to get a proper image size
5. Press Crop Image
a. Taken from the webcam
1. Press Take Photo
2. Adjust your position
3. Press Capture
4. Press Save
Participating in E-Forum
Situation 1: You have been invited
Log in as usual to the Private Community page
1. Find the name of the community to join. Example: Prof. Kumari Education Group community
2. Press Accept Invitation – if your teacher has invited you (for the first time only)
Example Situation 1

Situation 2: You are not invited but wish to join
Log in as usual to the Private Community page
1. Find the name of the community to join. Example: Prof. Kumari Education Group community
2. Press Request Membership – (for the first time only)
Wait for approval. You can log out first and then log back in once your application is accepted. If you’re still waiting – do a refresh / reload on your laptop or on your smartphone
Example Situation 2

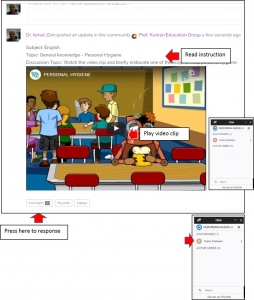
Interact with Group Members
The group community will be displayed after pressing the name of the group.
i. Read the instruction carefully
ii. Watch video clip or any other related links (contain learning materials)
iii. Response to the questions
Applications Procedures
Chat Room (Chat)
i. Chat room serves as a discussion board with friends before posted the answer to the forum
ii. Press Public Chat in the chat room to chat with all your friends
ii. Or press on a friend’s name to talk to the particular person only
A chat room allows files, images & links to be inserted
You may send links of your work in a google doc or google slide presentation in the e-forum
Example: Link to Folder (storage)
iii. Type of storage
• Google Classroom (Google Drive)
• Microsoft One Drive (need to sign in account –for the first time)
• Materials created in other offline application need to be uploaded to Google Drive or OneDrive
iv. Method
• Click on the relevant button (Example: Google Classroom page)
• Search for materials (kept in Google Drive)
• Copy file address (make sure it has shared permissions for all)
• Paste in forum space
• Press Submit
Example:
a. From Google Classroom
• Click on the relevant button (Example: Go to the Google Classroom page)
• Search for materials (stored in Google Drive)
• Copy link (make sure it has shared permissions for all)
• Paste in forum space
• Press Submit
Application Procedures
• You can find materials with other links – Google image, Google Info, etc.
• You can record audio – save it to google drive or One Drive and then enter a link in the e-forum space
• You can do video recording – upload it to YouTube and then copy the link to the e-forum.
• There is much more that can be done with your creativity to create a strategy
• These PLC-CIDS Digital Learning features are constantly updated to improve their user experience.
• There are also limitations (restrictions) on this application.
Application Procedures
Overview of e-forum buttons
Applications Procedures
Other optional features
Optional Feature: Massages
Situation: On certain occasions, you would like to send messages.
Procedures:
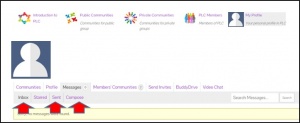
You must be on your profile site (Press My Profile)
1. Press Messages
The features below are similar to E-mail.
1. Press Inbox (to see messages)
2. Press Sent (to see sent messages)
3. Press Compose (to compose messages)
![]()